SPECIAL OFFER* – FREE SHIPPING on Orders Over $75
Use Coupon Code – THB75

Planning:
Take the time to plan: The installation of any fencing system begins before the first post is driven. The secret to getting the best value for your dollar is to take the time to thoroughly plan and then construct.

Check Local Laws and Ordinances: Laws governing placement of fences and electric fencing vary from county to county. Questions such as:
“How far must a fence be from a roadway?”
“Can an electric fence be used in a suburban area?”
“Are warning signs required?”
These questions must be answered. Check with your County Extension Office or, if in town, your City Clerk’s office.
Sketch a map:
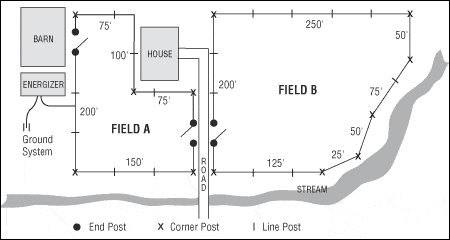
Begin by drawing a map of your property, including all major features: buildings, roads, fields, swamps, woods, gullies, streams and other features. Be sure to include: power, telephone, gas and oil lines as well as underground cables.
–> Mark the location of each End and Corner Post
–> Mark the location of each Line-Post based on the spacing you wish to use
–> Mark the location of the energizer close to an electrical outlet
(solar powered energizer may be used)
–> Calculate the total length of your fence
–> Choose the number of strands you wish to use. We recommend 4 strands.
–> Choose the type of line post you wish to use (wood, T-post, fiberglass or steel)
What you will need:
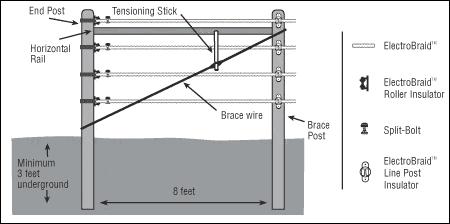
ElectroBraid™ is a tension system. End and corner posts should be braced as follows:
ElectroBraid™ Reels:
1. Multiply the length of your fence by the number of strands you wish to use and divide by the length of reel you will be purchasing = _____. This is the number of reels you will need.
ElectroBraid™ Roller Insulators for End, Corner and Vertical Changes is Direction:
2. Add the number of Corner posts and the number of End posts and multiply by the number of strands = _____.
3. Count the number of Line posts with vertical changes in direction (hills, gullies, etc) and multiply by the number of strands = _____.
4. Add these two numbers together ____ + ____=_____. This is the number of ElectroBraid™ Roller Insulators you will require.
ElectroBraid™ Line Post Insulators for End and Corner Brace Posts:
5. Multiply the number of End posts by the number of strands =_____.
6. Multiply the number of Corner posts by the number of strands and multiply by two =_____.
7. Add these two numbers together ____+____=_____. This is the of ElectroBraid™ Line Post Insulators you will require.
Line Post Insulators:
8. Your choice of Line Post – wood, T-Bar, Fiberglass or steel – dictates your choice of Line Post Insulator. Count the number of Line posts and multiply by the number of strands =_____. This is the number of Line Post Insulators you will need.
Copper Lead-Out Wire:
9. Add the widths of all your gates together and multiply by the number of strands =____+ (6′ x number of strands)=_____.
10. Measure the distance from your Energizer to the nearest point on the fence=_____.
11. Measure the distance from your Energizer to where your ground rods will be located = _____.
12. Add these numbers together = ____ + 20′ for the distance between ground rods = _____. This is the length of Lead-Out wire you will need.
Copper Split-Bolts are used to terminate a strand of Braid™, to splice two strands together and for electrical connections.
13. Count the number of End posts and multiply by the number of strands = _____.
14. Count the number of fence lines that exceed the reel size you purchased, multiply by the number of strands and multiply by two = _____.
15. Add one Split-Bolt for each electrical connection.
16. Add these two numbers together = _____. This is the number of Split-Bolts you need.
Energizer:
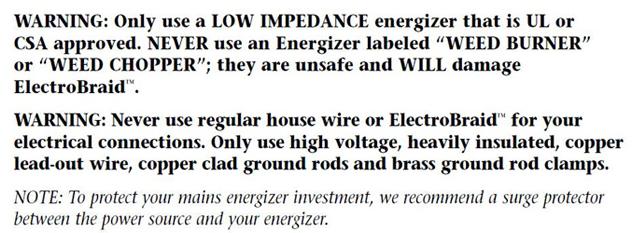
Please Click Here to Visit Our Energizer Page
for Critical Information in Selecting a Charger
Ground Rods:
You will require 3 ground rods (more for large fields or poor soil conditions).
Installation Kits & Tension Kits:
Every new ElectroBraid™ customer will want to purchase an Installation Kit. It contains the Installation Manual, a digital volt meter, (necessary for routine testing and troubleshooting), and one Tension Kit. A second Tension Kit is helpful to secure proper tensioning when the fenced pasture is larger than one acre.
More Information:
ElectroBraid™ and our dealers are here to help.
Call us for more information on fencing configurations, combination fence designs or other special considerations.
Freight to Alaska, Hawaii & other offshore or remote locations will be quoted separately.
The Healing Barn’s Friendly Staff is ALWAYS Here To Help.
Any Questions? Call us Toll-Free at 1-877-300-2638
We are always pleased to help.